/etc/ros/fastdds.xml文件内增加如下内容

1
2
3
4
5
6
7
8
9
10
11
12
13
14
15
16
17
18
19
20
21
22
23
24
<?xml version="1.0" encoding="UTF-8"?>
<profiles xmlns="http://www.eprosima.com/XMLSchemas/fastRTPS_Profiles">
<participant profile_name="unicast_connection" is_default_profile="true">
<rtps>
<builtin>
<initialPeersList>
<locator>
<udpv4>
<address>127.0.0.1</address>
</udpv4>
</locator>
<locator>
<udpv4>
<address>172.19.0.2</address>
</udpv4>
</locator>
</initialPeersList>
</builtin>
<userTransports>
<transport_id>lotsOfPeers</transport_id>
</userTransports>
</rtps>
</participant>
</profiles>

增加环境变量

1
echo 'FASTRTPS_DEFAULT_PROFILES_FILE=/etc/ros/fastdds.xml' > ~/.bashrc

前言

环境

系统版本: Windows 11 专业版 22H2

WSL版本

1
2
3
4
5
6
7
8
PS C:\Users\v_connliu> wsl -v
WSL 版本: 1.0.3.0
内核版本: 5.15.79.1
WSLg 版本: 1.0.47
MSRDC 版本: 1.2.3575
Direct3D 版本: 1.606.4
DXCore 版本: 10.0.25131.1002-220531-1700.rs-onecore-base2-hyp
Windows版本: 10.0.22621.1105

.wslconfig/etc/wsl.conf均使用默认配置

目前方案和需求

本人在一个内网环境,使用登录公司特定软件才可以访问网络
使用一台windows11电脑上,使用wsl开启的linux 环境用于日常linux 开发使用
因开发或者其他需要使用一个vpn代理软件,但因公司安全策略不能在宿主机安装,只好使用hyper-v 安装一个虚拟机在里面使用

使用hyper-v时网络是最大的难题

使用Default Switch

在hyper-v内使用Default Switch 没有网络
遂放弃

使用WSL

查看wsl网关

1
2
3
4
5
root@ubuntu:~# route -n
Kernel IP routing table
Destination Gateway Genmask Flags Metric Ref Use Iface
0.0.0.0 172.31.176.1 0.0.0.0 UG 0 0 0 eth0
172.31.176.0 0.0.0.0 255.255.240.0 U 0 0 0 eth0`

进入虚拟机后修改ip,子网掩码,网关,dns服务器
ip: 使用 172.31.176.0 同网段
子网掩码:255.255.240.0
网关: 172.31.176.1
dns服务器: 172.31.176.1
这样虚拟机就可以正常上网了, 但是 wsl 重启会导致 网关变动,进而导致 使用固定网关的虚拟机内也无法使用网络

需要一种解决方案既可以在wsl 可以访问网络,在 虚拟机内也可以访问网络的方案

固定wsl 的Gateway

修改/etc/wsl.conf的systemd 配置

1
2
[boot]
systemd=true

修改/etc/systemd/network/eth0.network为如下内容

/etc/systemd/network/eth0.network
1
2
3
4
5
6
7
8
9
10
11
[Match]
Name=eth0

[Network]
Address=172.17.112.46/20
Gateway=172.17.112.1
Description=lan
DHCP=no
EmitLLDP=true
LLDP=true
IPForward=true

重启生效

1
wsl --shutdown

查看服务

查看所有

1
systemctl --type=service 

查看特定状态的服务

1
2
3
4
5
6
systemctl  --type=service --state=load 
systemctl --type=service --state=loaded
systemctl --type=service --state=failed
systemctl --type=service --state=active
systemctl --type=service --state=exited
systemctl --type=service --state=running

查看 运行状态

1
2
3
4
5
6
7
8
9
10
11
12
13
nvidia@nvidia-desktop:~$ systemctl status fstrim.service
● fstrim.service - Discard unused blocks
Loaded: loaded (/lib/systemd/system/fstrim.service; static; vendor preset: enabled)
Active: failed (Result: exit-code) since Mon 2023-01-02 00:00:43 CST; 3 days ago
Process: 1135 ExecStart=/sbin/fstrim -av (code=exited, status=64)
Main PID: 1135 (code=exited, status=64)

Jan 02 00:00:32 nvidia-desktop systemd[1]: Starting Discard unused blocks...
Jan 02 00:00:32 nvidia-desktop fstrim[1135]: fstrim: /data: FITRIM ioctl failed: Input/output error
Jan 02 00:00:43 nvidia-desktop fstrim[1135]: /: 9.1 GiB (9720225792 bytes) trimmed
Jan 02 00:00:43 nvidia-desktop systemd[1]: fstrim.service: Main process exited, code=exited, status=64/n/a
Jan 02 00:00:43 nvidia-desktop systemd[1]: fstrim.service: Failed with result 'exit-code'.
Jan 02 00:00:43 nvidia-desktop systemd[1]: Failed to start Discard unused blocks.

查看失败错误信息

根据 进程id 查看

1
journalctl _PID=1135

根据 服务 查看

1
journalctl -u fstrim

根据官方文档manage-install,我们使用go install 安装新版本golang

安装下载新版本

1
2
3
4
$ go install golang.org/dl/go1.18@latest
$ go1.18 download
$ go1.18 version
go version go1.18 linux/amd64

但是这个时候go1.18 并不是默认版本

设置新版的go1.18为默认 版本

which 得到程序的执行路径

1
2
which gogo1.18
/root/go/bin/go1.18

使用update-alternatives 管理多版本go
update-alternatives --install <软链> <名字> <路径> <优先级>

1
update-alternatives --install /usr/bin/go go $(which go1.18) 900 

其他update-alternatives 命令

1
2
3
update-alternatives --display go #查看已安装
update-alternatives --auto go #自动按优先级(最大的数)设置版本
update-alternatives --config go #修改版本

总结

备份旧版

1
2
3
4
5
6
$ which go
/usr/local/go/bin/go
$ go version
go version go1.16 linux/amd64
$ mv /usr/local/go/bin/go /usr/local/go/bin/go1.16
$ update-alternatives --install /usr/bin/go go $(which go1.16) 800

一行命令安装新版golang

1
v=1.17 && go install golang.org/dl/go${v}@latest && go${v} download && update-alternatives --install /usr/bin/go go $(which go${v}) 900

1. hello word

创建 hello.cpp 文件

hello.cpp
1
2
3
4
5
6
7
#include <iostream>
using namespace std;
int main()
{
cout << "Hello World";
return 0;
}

编译可执行文件

1
$ g++ ./hello.cpp -o hello

运行

1
2
$ ./hello
Hello World

2. 区分输入到stdout 和 stderr

创建 hello_std.cpp 文件

1
2
3
4
5
6
7
8
9
10
11
12
13
#include <iostream>
using namespace std;

int main(int argc, char *argv[])
{
std::cout << "Hello World" << std::endl;
if (argc == 2)
{
std::cerr << "当前不支持额外参数" << std::endl;
return 1;
}
return 0;
}

现在使用std::cout 来做标准输出,使用std::cerr 来做错误输出,注意return也是非0

运行

1
2
3
4
5
6
$ ./hello_std sds > out   # 把标准输出重定向到out文件,仅保留错误输出
当前不支持额外参数
$ echo $? # 上次执行返回值为1
1
$ cat out # 查看标准输出文件out
Hello World

2. cmake编译

2.1 创建 config.h.in 文件

config.h.in
1
2
3
#define VERSION @PROJECT_VERSION@
#define VERSION_MAJOR @PROJECT_VERSION_MAJOR@
#define VERSION_MINOR @PROJECT_VERSION_MINOR@

PROJECT_开始的3个变量是cmake的内置变量,参见cmake project

2.2 创建 CMakeLists.txt 文件

1
2
3
4
5
6
7
8
9
cmake_minimum_required(VERSION 3.10)

# 设置项目名为hello 版本为1.0
project(hello VERSION 1.0)

# 根据config.h.in 模板文件 把cmake PROJECT_VERSION 变量输入到config.h 头文件
configure_file(config.h.in config.h)
# add the executable
add_executable(hello hello.cpp)

2.3 更新hello.cpp

hello.cpp
1
2
3
4
5
6
7
8
9
10
11
12
13
14
15
16
17
18
19
20
21
22
#include <iostream>
#include <vector>
#include "config.h"
using namespace std;

int main(int argc, char *argv[])
{

if (argc == 1)
{
std::cout << "Hello World" << std::endl;
return 0;
}
// 把 char 类型的argv 转为 string 类型
std::vector<std::string> all_args(argv + 1, argv + argc);
if (all_args[0] == "version")
{
std::cout << "Version " << VERSION << std::endl;
return 0;
}
return 0;
}

2.4 编译

1
2
3
cmake .  # 根据CMakeLists.txt 生成 Makefile 文件
make # 根据Makefile生成可执行文件
./hello version # 启动应用

起因是因为项目内使用了一个执行命令的 deputy包,需要移除包,重构代码

1
2
3
4
5
6
7
8
9
10
11
12
13
14
15
16
17
18
19
20
21
22
23
24
25
26
27
28
29
30
31
32
func SyncRunTimeout(timeoutSeconds time.Duration, commandName string, params ...string) (string, error) {
out := ""
isTimeout := false
cancel := make(chan struct{})
go func() {
<-time.After(time.Second * timeoutSeconds)
isTimeout = true
close(cancel)
}()
d := deputy.Deputy{
Errors: deputy.DefaultErrs,
StdoutLog: func(b []byte) {
out = string(b)
log.Println(out)
},
StderrLog: func(b []byte) {
out = string(b)
log.Println(out)
},
Cancel: cancel,
}

cmd := exec.Command(commandName, params...)
if err := d.Run(cmd); err != nil {
return out, err
}

if isTimeout {
return "", errors.New("exec cmd timeout")
}
return out, nil
}

这个方法实现了执行超时错误,返回命令输出,命令执行中实时打印输出3大功能
检索资料借鉴了GO语言执行命令超时的设置
得到如下代码

1
2
3
4
5
6
7
8
9
10
11
12
13
14
15
16
17
18
19
20
21
22
23
24
25
26
27
28
func SyncRunTimeout(timeoutSeconds time.Duration, commandName string, params ...string) (string, error) {
cmd := exec.Command(commandName, params...)
var stdout bytes.Buffer
cmd.Stdout = &stdout
err := cmd.Start()
if err != nil {
return "", err
}
done := make(chan error)
go func() { done <- cmd.Wait() }()
after := time.After(time.Second * timeoutSeconds)
select {
case <-after:
err = cmd.Process.Signal(syscall.SIGINT)
if err != nil {
return "", err
}
time.Sleep(time.Second)
err = cmd.Process.Kill()
if err != nil {
return "", err
}

return "", errors.New("exec cmd timeout")
case <-done:
}
return stdout.String(), nil
}

但是如上方法有个问题,无输出时命令执行错误无法提示
例如 echo "abc" | grep d

1
2
3
$ echo "abc" | grep d
$ echo $?
1

如果用如上代码echo "abc" | grep d执行,既没有返回命令输出,也没有报错,这在单元测试是不通过的

阅读全文 »

因 grafana 告警信息太多无用数据,容易干扰查看
例如使用 企业微信告警消息如下
alert.png
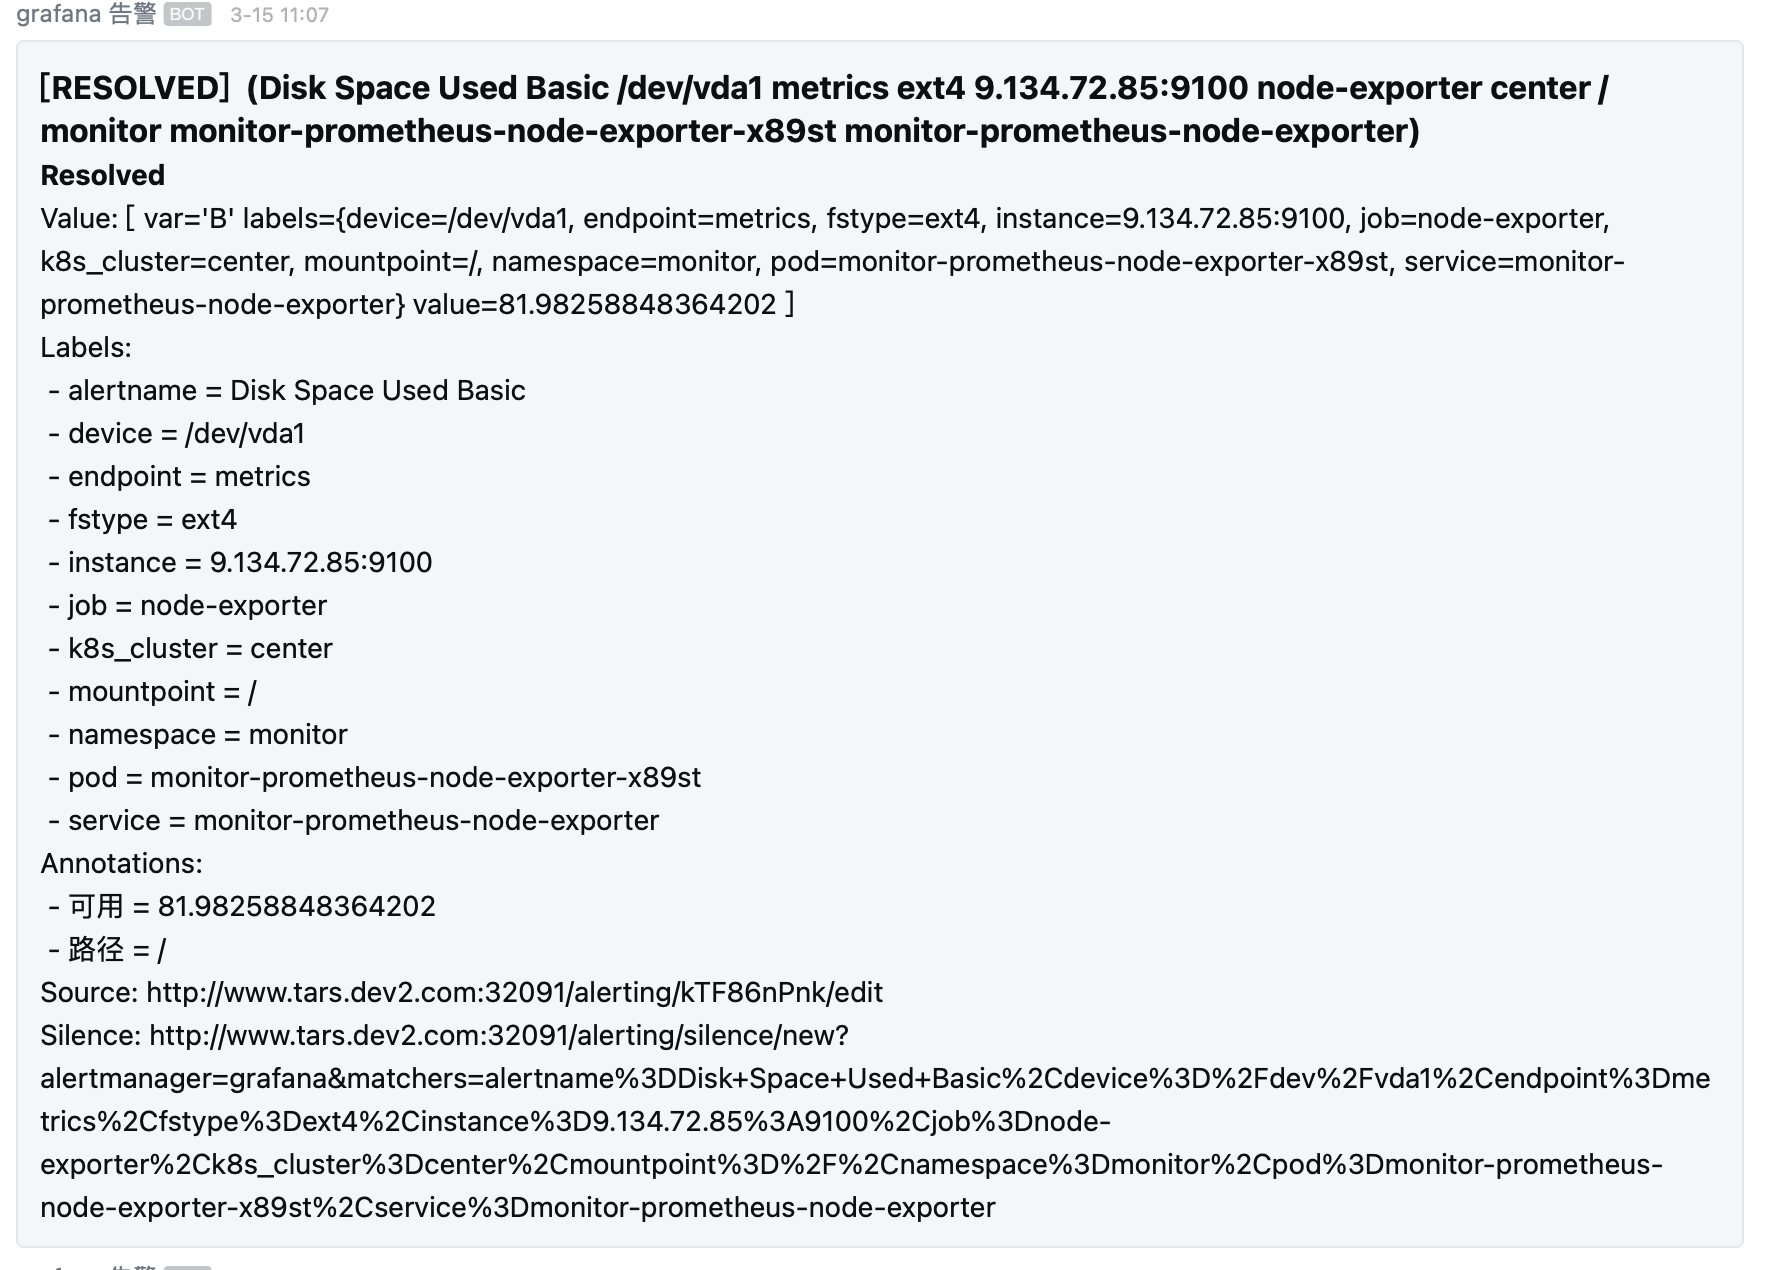
太多无用Labels 例如 endpoint,job,pod,service
还有Value 字段太占空间,Source, Silence 字段,因太长且无用
所以修改模版来精简告警消息

方式一: 文本类告警

例如企业微信类的文本告警,根据官网文档知道默认模版来自 default_template.go
主要定义了2个模版,一个是__text_alert_list ,另一个default.message 使用了模版__text_alert_list
我们只需要根据__text_alert_list 模版修改为自定义模版即可

  1. 创建一个消息告警模版
    打开grafana 页面,点击左侧 alerting 图标 ,点击 Contact points 菜单 ,点击New template 按钮
    Template name 填写 text_alert_list
    Content 内 复制如下原始模版
    阅读全文 »

我们在使用 kratos 时 发现没有热部署,每次更新代码都要重新编译,并且重新执行
即使使用 kratos run 也要 停止命令,重新编译

第一个热编译选择了 oxequa/realize ,实际使用中发现 各种无法运行
可能是我打开的方式不对。而且项目好像已经停止维护了…

然后选择 使用 cosmtrek/air 中乱码

1
2
3
4
5
6
7
8
9
[11:17:56] watching internal\service
[11:17:56] !exclude run
[11:17:56] watching test
[11:17:56] building...
[11:17:59] running...
'.' �����ڲ����ⲿ���Ҳ���ǿ����еij���
���������ļ���
[11:18:05] cleaning...
[11:18:05] see you again~

在所有win 命令行下均有此问题,包括cmd,GitBash,PowerShell
在win10 内置linux下无此问题

阅读全文 »

创建时间 create_time 使用的 timestamp 类型
额外参数 仅在 附加规则functioncallback 时有效
thinkphp 文档内没有说明如何使用带参函数或者带参回调

1
2
3
4
5
6
7
8
9
10
namespace Home\Model;
class UserModel extends Model {
protected $_auto = array (
//array('field','填充内容','填充条件','附加规则',[额外参数])
array('status','1'),
array('password','md5',self::MODEL_BOTH,'function') ,
array('name','getName',self::MODEL_BOTH,'callback'),
array('create_time','date',self::MODEL_INSERT,'function','Y-m-d H:i:s')
);
}
0%